
Creating Vector Lineart (Part 1): The Tools
A quick introduction to the tools I most commonly use when creating lineart/outlines in Adobe Illustrator.
Selection Tools

Selection Tool (shortcut V) - Allows you to select and manipulate an entire shape or path.

Direct Selection Tool (Shortcut A) - Allows you to select and manipulate one or more anchor points.
You can click and drag to select more than one anchor point.
Pen Tool

The Pen Tool (Shortcut P) is used to create and manipulate paths from scratch.
Hold your shift key as you set your anchor points to create straight lines.

The Add Anchor Point Tool (Shortcut P+) Allows you to add anchor points to an existing path.

The Delete Anchor Point (Shortcut P-) Allows you to delete anchor points.

The Anchor Point Tool (Shortcut shift + C) allows you to create and manipulate curves by extending handles out of an anchor point.
Shape Tools
Shape tools make it quick and easy for you to create geometric shapes.

Rectangle Tool (Shortcut M)

Rounded Rectangle Tool (no default shortcut) can be selected from the toolbar or created by first making a rectangle and pulling on the circles that appear near the inner corners when the rectangle is selected.

Ellipse Tool (Shortcut L)
Pathfinder

The Unite Shape Mode will add all shapes into a single path and use the fill and outline of the frontmost path.

The Subtract Shape Mode deletes the frontmost shape and cuts any overlapping parts from the shapes beneath it.

The Divide pathfinder cuts out each individual shape like a puzzle.

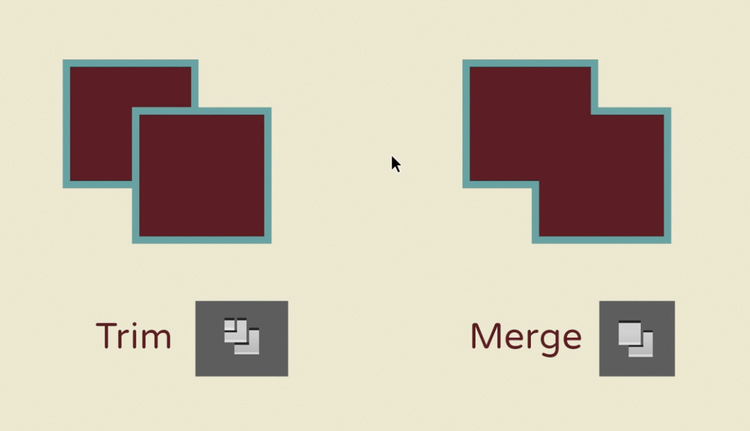
The Trim pathfinder trims around any visible paths.

The Merge pathfinder will combine all overlapping paths with the same fill into one single path.
Note: The difference between the Trim and Merge pathfinders only becomes apparent when you use the same fill for two overlapping paths.
Align

Note: You need to choose what you align your selections to. You can align them to your entire selection, a key object or the artboard. I personally don't use the key object option.
Align to Artboard means your selection will align with the center and sides of the entire artboard. This is very useful when you're creating a piece that's very symmetrical.
Align to Selection means your selection will align with the center and sides of the area taken up by your entire selection. This is helpful when working with and arranging complex shapes.
I mainly use the center Distribute Object Tools, which evenly distribute your selected shapes or objects at equal distances from each other.
Horizontal Align

flush left

centered

flush right

distribute object center
Vertical Align

flush top

centered

flush bottom

distribute object center

